

Any applications developer worth their salt will, even when they have downtime, look for new ways to make themselves more productive whilst retaining their quality levels. One such way that we do this is to have ‘Application Frameworks’, common blocks of code and infrastucture that we use on every project. If we were to write this infrastructure and wiring on every project it would just add to the cost and to the drama.
First off, a little bit about how we like to develop applications. The bare bones of our project infrastructure is as follows:
Our applications tend to be .NET MVC 4 web applications developed using the Repository and Unit of Work patterns. In order to support these patterns and for many many other reasons we use the completely awesome Structure Map. For our data layer we utilise the Entity Framework sitting astride SQL Server, MongoDb or RavenDB. We also utilise DTOs or View Models for the presentation layer and so in order to support the marshalling of the data between the data and presentation layers we use Automapper which is also amazingly useful. Finally on top of this we use Fluent Validation to validate the data being presented to the web service.Wow… So that’s quite a lot going on and the framework we use can to the untrained eye be reasonably complex and is relatively time consuming to scaffold as we create 12 classes which each know about each other through interfaces. Referring back to my Plural Sight course in Application Framework development I think the phrase that springs to mind is that creating all of this ‘infrastructure’ is ‘an uninteresting concern’. We thus decided that the best way to remove this tediousness from our lives was to create ‘Visual Studio Templates’ so that when I want to create, say a Contact class, that needs to be persisted to and from the chosen database I just need to ‘Add New Item’ as you would when creating a normal class, give it a name and let visual studio create and scaffold the whole stack as it were from Controller, through to Entity class. For those of you interest here are the classes that a typical ‘Entity’ will wind up utilising:-
EntityNewViewModel
DeleteViewModel
UpdateViewModel
NewViewModelValidation
DeleteViewModelValidation
UpdateViewModelValidation
Repository and RepositoryInterface
Service And ServiceInterfaceController
So scripting this whole stack is not such a large thing, we already have classes that we have developed, tried and trusted, and so its just a case of rewriting these so that visual studio can replace some placeholders with the name of the class as entered by the user. So…
Our ‘entity’class is defined thus:-
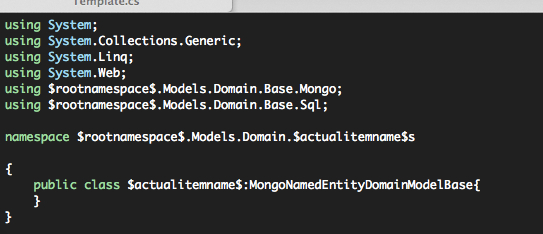
A couple of things to note here, any visual studio placeholders are defined inside $ signs like for instance $rootnamespace$. As you can see the following placeholders are used in this template, our Entity template:-
$rootnamespace$ – This is a visual studio defined placeholder which will output the default namespace defined at project level. If you then, as we do here, bury the objects deeper in your project structure you will need to reflect the rest of the namespace later.
$actualitemname$ – This is a custom defined placeholder which will output the text AS ENTERED by the user on the ‘AddNewDialog’. Please note that the visual studio documentation is a little misleading as it indicates that $itemname$ and $safeitemname$ which are vs placeholders equate to the text as entered by the user whereas in fact it is not, they instead related to the target name specified for the output of the file which we will come on to later.
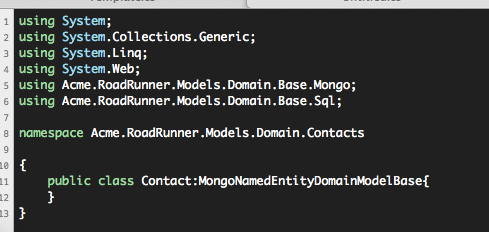
So using our ‘Contact’ example against a project namespace of ‘Acme.Roadrunner’ our Contact Entity would be generated thus:-
I’m not going to detail all of the classes that we will utilise but they all work in pretty much the same way, as a slightly more complex example please see the Repository interface and implementations below:-

which will generate as:-
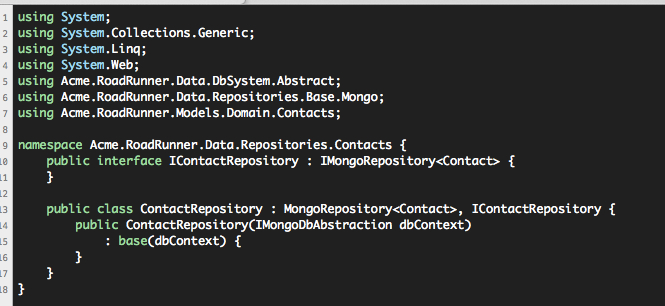
As you can see, nothing much happens in this class, and that’s exactly how we want it… The more we can pass off to base class implementations the less code we have to re-write.
OK. In order for the ‘AddNewItem’ functionality to work the items that are to be added need to be included within an xml file. The name is unimportant I think so long as it is the only *.vstemplate file within the directory. A cut-down version of my file is displayed here:-

I’m not going to insult your intelligence by explaining the items under template data, this just tells how visual studio how to display the ‘AddNewItem’ within the ‘Add New’ dialog. We are interested in the items under TemplateContent:-
CustomParameter details any placeholders that we wish to expose within the templates, in this instance we set the $actualitemname$ to equal the $fileinputname$, that is… what the USER entered.
We have also defined one project type for each type of file that we wish to generate, We set ReplaceParameters to true to indicate that we expect vs to format the output file using any provided parameters. The TargetFileName equates to the name of the file that we wish to generate (Note that I always expect this operation to be carried out from the base directoy). In this instance we have a specified a path as well relative to the base directory. You may also use placeholders within the path and any folders not already in existence will be created. The value within the xml node itself is the name of the file we wish to use as the template for the file that we are going to generate (I have defined a flat structure but you may use paths if you so desire) SO in the first example we are saying create a file called ‘ContactsRepository.cs’ within the project folder
ProjectRoot\Data\Repositories\Contacts
We should use the ‘TemplateRepository.cs’ file as our template. Note that if you were to try using $itemname$ within the TemplateRepository template the value in this instance would be ‘ContactsRepository’ not ‘Contact’ that we get by using $actualitemname$
OK. So, we have defined all of our files, all that now remains is to get this installed into Visual Studio…All I say, this was in fact the hardest part!. Here is what I found…
Firstly we need to add all of the above artefacts into a zip file, i entitled my zip file the same as the ‘Name’ property in the ‘TemplateData’ section of the vstemplate file. Once zipped I did the following and you may need to experiment as things did not work for me as other people seemed to experience:-
First place the zip file within the following directory:-
VisualStuioDir\Common\Ide\ItemTemplates\CSharp\General (or another category of you choice, you could even create your own if you so desire)
Once this has been done run the Visual studio command prompt (as an administrator) and then run the following command line (with all studio instances closed)
devenv / installvstemplates
This operation can take a fairly lengthy period of time and is completely silent so you will need to be patient. Once done and the command line returns to you so that you may interact with it you may open studio and when you go to the AddNewItem Dialog your new itemtemplate should be displayed.
This saves me a ton of time on a daily basis, a little bit of overhead in setting it all up but more than worth the effort in the long run. I hope this helps you too..