
So, IBeacon…. You may or may not have heard of this technology, Indeed up until a year or so ago I must confess that I had not. I really wish that this excellent Dot Net Rocks episode had been available when I first started looking into this technology so go look (But do come back!) These funny little items then ended up on my desk, 3 in all, and I wondered what to do with them. As with most things that cross my desk eating them was an option but they looked pretty inedible so after an interval of some months I instead opted to find out what I was supposed to do with them. So i headed over to the Estimote website who are the manufacturers. “Estimote Beacons and Stickers are small wireless sensors that you can attach to any location or object. They broadcast tiny radio signals which your smartphone can receive and interpret, unlocking micro-location and contextual awareness.” Instantly I can imagine that sales and marketing teams are practically wetting themselves at yet another opportunity to push their unwanted wares upon us in yet more insidious ways. I know that the first and every other subsequent app that tries to promote their wares to me in this way will be removed from my life for ever. I do not need any help in spending money. However looking beyond the more obvious tired use case for these beacons and examining the phrase ‘contextual awareness’ raises some real and positive use cases that I as an individual would actually subscribe to. ‘Contextual awareness’ or ‘Augmented Reality’ is the process of providing supplemental information about an environment or area that would further help the user to understand or interact with his/her surroundings; that is, enriching the real world with appropriate digital information ensuring that that ‘viewer’ has access to a fuller understanding of the environment which they find themselves in. So real world examples…. Well mostly people are trying to sell you stuff.. sigh, you know the drill, you walk into a department store and as you approach the perfume department the stores app will sense your proximity (and odour!?!) and will tell you what special offers are available today. Like I said, any app that does that for me will be gone instantly. Some companies however are a little more imaginative:-
- American Airlines + Virgin Airlines are using the technology to guide you through the airport experience. So as you arrive at certain locations within the building the app will detect a beacon in its proximity, using this information (your location) and the fact that its your phone (and therefore you hopefully) the app can then interrogate the airline passenger system to best guide you through the system. If you haven’t yet checked in it could tell you that you should make your way to desk EE5 to check-in. If you have checked in and you’re sat in the entrance lobby when you flight is about to close it could warn you that you really need to head to security or you’ll miss your flight. All of this is actually REALLY helpful especially if you are overwhelmed in such busy environments. The point is that the information it delivers is contextual to both you and your environment.
- Rubens House – This museum in Antwerp houses a collection of many of the artists great works and uses beacon technology to provide supplemental information about the exhibit that the viewer is currently in proximity to. This could be as simple as links to further works and thesis on the web about a painting or it could be as enriching as the ability to view some of the paintings under an x-ray or with extra guidance notes pointing out elements of the works that may not be apparent to the viewer. It also allows the museum to drive the viewers around the gallery in the most effective way so preventing bottlenecks.
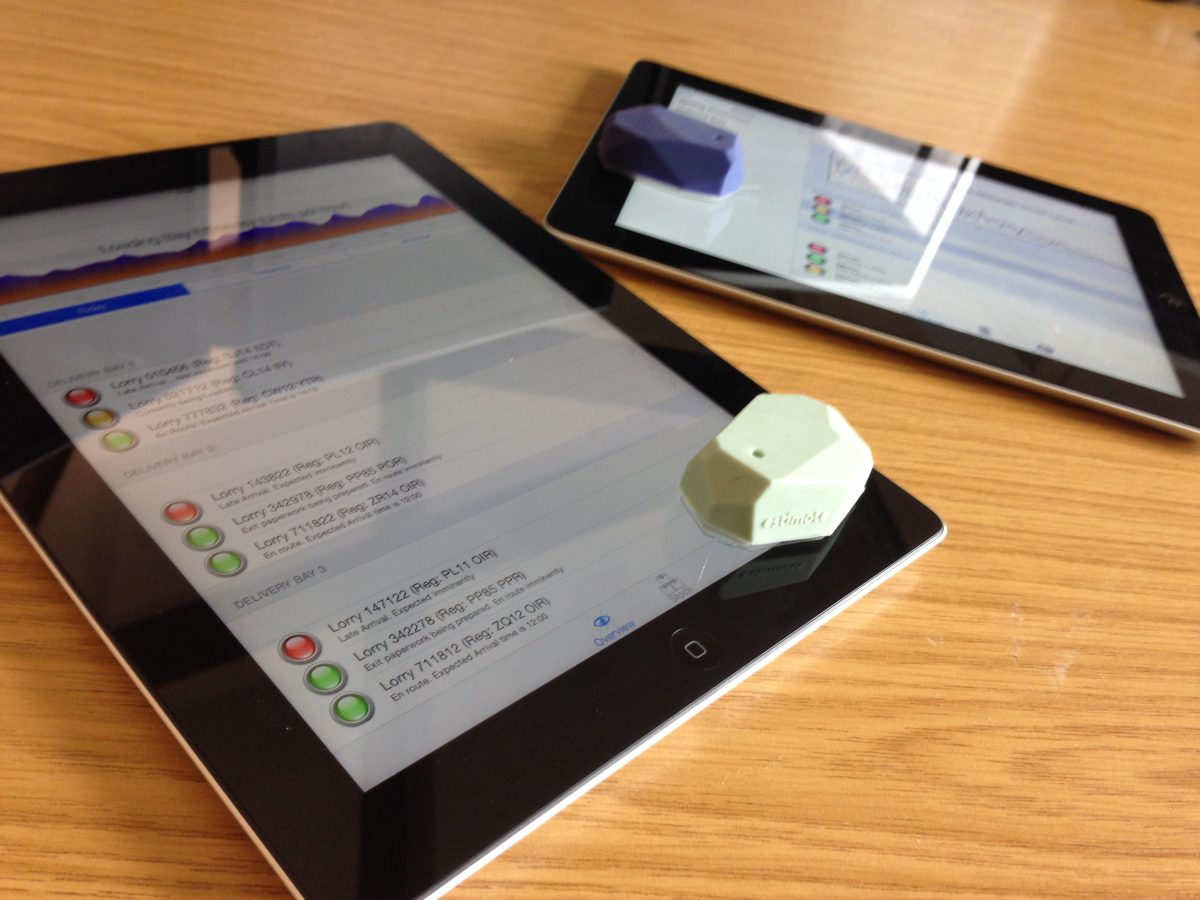
And then you start to think about practical applications… So as part of a technology preview , a possible blog and a POC to a potential client I decided to create an Augmented Reality i-Pad app that could be used to demonstrate how a standard production line could be enhanced by utilising beacon technology. The basic premise for this POC app is that it would be used by management to view the status of their operations. They would need one i-Pad app that as they traversed the factory floor would deliver relevant information to them about the area of the factory they were in. If they walk into the delivery bay its very likely that they would want to see that status of the deliveries for the day and what the pipeline is for the day and whether there are any hold ups. If however they were to walk into the spring fabricating department they would likely want to know about the springs that had been produced today, whether they were behind schedule, whether there was enough wire to fabricate the orders that needed to be satisfied etc etc. The actual samples used are not important, we could be reporting on glass hammer production or fog knitting. So to start thinking about the app (full source of which is available from my Augmented Reality Git Repository), in my instance I wanted to be able to support many many different parts of the production process, potentially in the thousands. I also wanted to be able to elect to view the details for a production process without visiting the area, sure I could do with the exercise but that’s ridiculous! So for this reason I decided to go with a master detail layout for the main application layout. The master page would have one table entry for each part of the production process (and thus beacon) and the detail page would show the detail of the selected process. This in turn presents another problem, as we are displaying one item for each stage of the production in the master view this in turn means that each item will load a DIFFERENT screen so a standard segue would not suffice here as that will load different data into the SAME screen. So a little bit of research led me to the following Git repository where there was a very handy demo of the kind of thing i was looking for. It was a very good start and I adapted it further for my own usage. Firstly my storyboard looked liked this:- 
And the main thrust of the code implemented:- 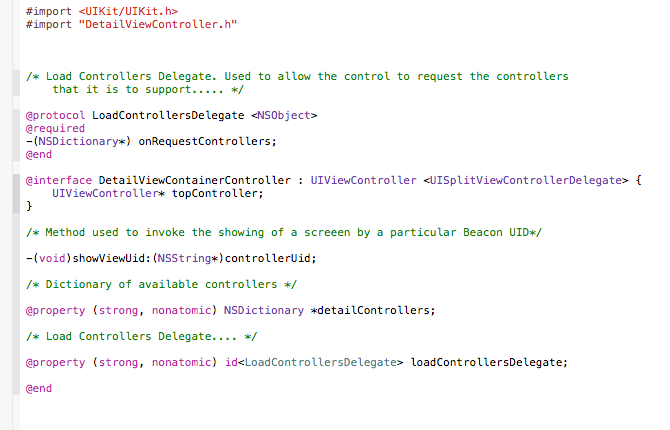
We start with the LoadControllersDelegate which is how this class obtains the list of controllers that may be loaded. Moving along we then have the ShowViewUid which when given a controlleruid will invoke the load of a controller from the collection of controllers. Finally we have a couple of properties used to store the dictionary of controllers and the delegate which provides the controllers int he first place. Moving onto the implementation itself we change the viewDidLoad to look something like this:-

The only thing to note here is the invocation of the loadControllers method which looks like this:- 
This method will invoke the delegate to load the dictionary of controllers, this will be a dictionary with a unique key (in our case a beacon id) and against each unique key will be the controller name as defined on the storyboard itself. This dictionary will thus be interrogated and for each entry provided the relevant controller will be instantiated, added to the detail controllers collection and also added as a child view to the view controller. We then detail the code used to display a particular controller upon selection. The code is as follows:- 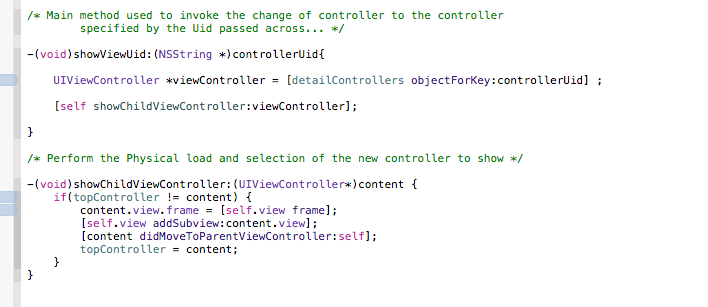
From the point of view of the DetailContainerController coding we are done. We just need to put some plumbing code in the master view page as detailed below:- 
The two key lines here are the two selected lines. The firs obtains a reference to the detailViewContainerController and retains it for ease of use. The second sets up the delegate that will request the list of controllers that the detailViewContainerController needs to know about. The implementation of the actual delegate is detailed below:- 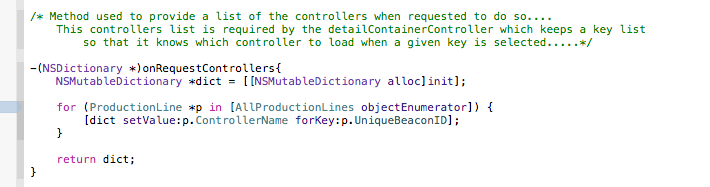
Really very simple, this method returns a dictionary of ControllerNames (as defined on the storyboard, more of that later) and each is keyed by the beacon id associated with that controller. Right now to the rest of the storyboard, in essence we then define two more controllers entitled DeliveryController and SpringController as per the storyboards below:- 
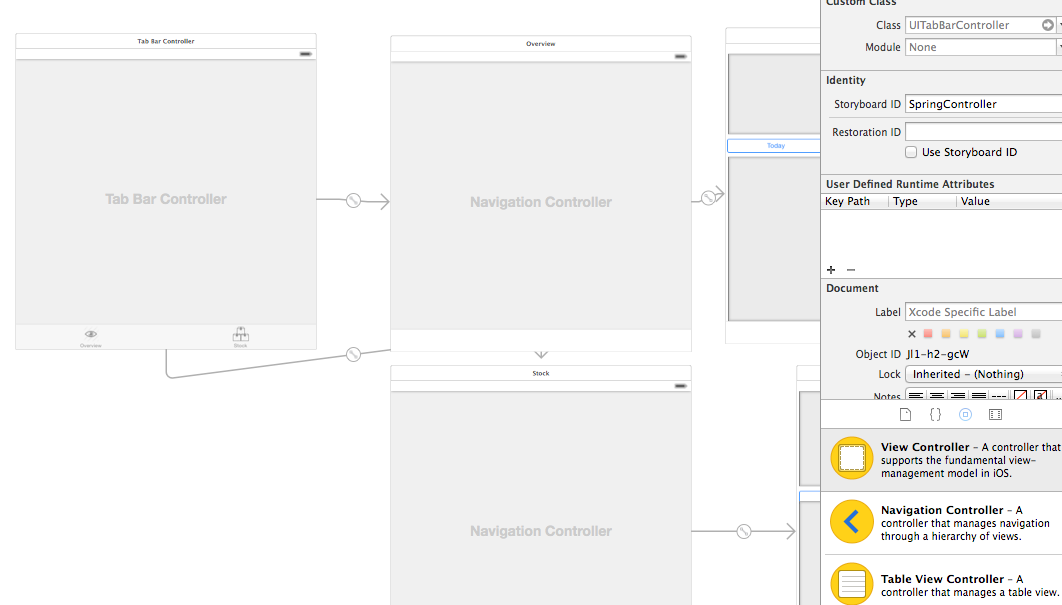
The only real items of note here are the two top level controllers. These are the items that will be added directly to our DetailViewContainerController. OK, onto the main point of this blog, the beacon monitoring itself. Now my solution is quite complex as I wanted to achieve more complex things than just be able to simply monitor a beacon and I wanted full reusability of the classes I created. So I created the following Classes:-
![]()
1. BeaconDefinition – Defines a beacon object, either one to be monitored or to be returned as a beacon found.
2.BeaconMonitorResult – Defines a result of all of the beacons found from the BeaconMonitor class.
3. BeaconProximity – Defines an bit class enumeraton closely linked to the IBeacons CLProximity enumeration. This class was required because I wanted to be able to support the search for mutliple proximities within a range operation.
4. BeaconProtocols -Defines the delegates exposed by BeaconMonitor and IBeacon class. Probably overkill actually in retrospect.
5. BeaconMonitor – The main class used to monitor for a beacon. Each BeaconMonitor object will range for ONLY one beacon UUID so in order to support multiple UUIDs we need to be able to consime multiple BeaconMonitors.
6. IBeacon – Class used to invoke and manage all of the BeaconMonitors. This class martials all of the underlying results and only returns the full collection of beacons found if new beacons are found or existing beacons disappear from range. This is the class which we will interact with at the application level. Right time to deep dive, Lets start with the Protocols:- ![]()
As I mentioned earlier, I think breaking these out into their own classes may have been a little over the top but I’m here now! The BeaconsFoundDelegate is effectively exported by the IBeacons class and whenever the full list of beacons changes this delegate will be invoked. The BeaconMonitorFoundDelegate is the same sort of thing but is instead exposed by the BeaconMonitor class and consumed by the IBeacons class. Next to the proximity enumeration:- ![]()
Near as dammit this mirrors the CLProximity class in available settings, only the value differ as I wanted bitmaskable flags. Next we get to the BeaconDefintion class itself:- ![]()
Nothing too complex here, just the properties that a beacon has and three different initialisers. Note that init function which specifies no data except for the OR’d Proximity value of Near or Immediate. ![]()
And again nothing too complex here, isProximateTo just returns a boolean value as to whether a CLBeacon proximity value matches the proximity value for the BeaconDefintion. So for instance If I say I want to monitor all beacons of UUID ‘xxxxxxx’that are near or immediate to my vicinty this method would be invoked for all beacons currently within any range at all. The CLProximity value is then converted to our BPProximity value and this value is OR’d with the proximity set for this beacon. The next two methods are merely helper classes to derive consistent system wide unique ids for a beacon using both our BeaconDefintion object or the main CLBeacon object derived from the IBeacons library., Given the same beacon values these methods should both return the same ID. So now we get to the real meat and veg class… BeaconMonitor. This class manages the interface between our application and the IBeacons library. So without further ado lets take a look at the header file for an overview:-
![]()
The first two items are fairly self explanatory,
1. beaconDefintion property stores information about the beacon that we are monitoring.
2. beaconKey stores the unique key of the beacon that we are monitoring. (Strictly speaking I think that this is no longer required as you could go to the beacon definition itself for this information).
3. beaconMonitorFoundDelegate property is used for notifying of any changes to the beacons in range.
4. locationManager and locationRegion are iBeacon interfaces, more of those later.
5. availableBeacons stores references to the beacons we have found.
6. startMonitoring and terminateMonitoring are methods used to control the monitoring process. Time to dig a little deeper with the implementation itself… Lets start off with the initWithBeacon method:- ![]()
This method accepts our beacon defintion, stores the key to this beacon definition before initalising a CLLocationManager object registering the beaconMonitor for all delegate call backs.We then request ‘Always’ authorisation for using location services before finally starting the location services. We then need to look at the StartMonitoring method:- 
which checks to see if locationservices are currently enabled and whether the user has granted permisson to ALWAYS access the location services. We then initiate a locationRegion using the Beacon UUID (but not the major or minor numbers) and finally start ‘ranging’ for beacons in the vicinity. Each time that new beacon information is available this initiates the callback into the ‘didRangeBeacons’ delegate that we have implemented below:- ![]()
This method quite simply iterates over all of the provided CLBeacons in region and calls the isProximateTo property of the beacon definition object to check whether the CLBeacon is within the proximity range laid down for this Beacon UUID. If it is the CLBeacon is within range a BeaconDefinition object representing this CLbeacon is instantiated and added to the collection of beacons found. These beacons are then passed off to the addBeacons method before the outside world is notified IF the beacons found were different to previously found beacons. The logic to this addBeacons method is reasonably complex and detailed below:-
![]()
So we firstly iterate over all of the beacons currently within the list and see if these beacons exist within the newly found list of beacons. If the beacon does exist then it is currently in range and so we clear the ‘scansSinceLastFound’ variable (more of that in a second). If the beacon does not exist within the list of newly found beacons this means that it was previously in range but is no longer so. So we increment the ‘scansSinceLastFound’ variabel by one. In addition if the scansSinceLastFound value exceeds 1 (that is we have not found it on two consecutive scans) then we add this beacon to a list of beacons that we are going to remove. The reason we use this scans since last found variable is that I have found the signal to be a little wanting occasionally and sometimes with seemingly no movement of the beacon they will just disappear from range for no reason. This is a simple attempt at error correction. If there are items to delete we then trigger a ‘hasChanged’ flag which indicates that we should raise an event to inform the outside world that the beacons have changed. ![]()
We then remove any beacons no longer in range from the main collection. We thus iterate over the newly found beacons adding any that no longer exist to the main collection. We then return a value to indicate whether the main collection was changed at all by this method which in turn will be used to raise an event to the outside world to let it know that the beacons in range have changed. So we finally turn to the IBeacon class, this is the main interface between our application and the BeaconMonitors. The class is defined thus and as you can see it consumes the BeaconMonitorFound Delegate which it does for each BeaconMonitor object that it manages. ![]()
We start with the initWithBeacons method. This method is called passing across a mutable array of BeaconDefintion objects that are to be monitored. These are then added to the internal dictionary for later use using the addBeaconToMonitor method. ![]()
In the addBeaconToMonitor method we first check to see whether or not the beacon we are adding has already been added. If the beacon has been added the action is terminated, otherwise we initiate a new BeaconMonitor passing the BeaconDefinition class to feed the creation process. We then register our ibeacon class to receive BeaconFoundDelegate events raised from this new Beacon Monitor before commencing the monitoring process. ![]()
The start monitoring process is a helper method used to start monitoring all of the BeaconMonitors at once. ![]()
Similarly the terminate monitoring method is a helper method to terminate monitoring on all BeaconMonitors at once. ![]()
Finally the onBeaconsChanged delegate which handles when an underlying BeaconMonitor class provides updated list of beacons within range. Essentially this method deals with what happens when the beacons underlying a particular monitor changes. What happens is that this new collection of ‘beacons’ are associated with the results object for the current beacon monitor. When all of the beacon monitors have been refreshed then these results will be propagated to our application using the ‘BeaconsFoundDelegate’
![]()
Obviously I’m aware that if you have purely followed my instructions you will not have a working application! The blog is purely used to discuss the project the source of which is available from my Git repository. Enjoy….
