Welcome to Part 2 of this blog designed to help keep your .NET core web applications, and thus businesses, more secure with those critical little secrets that your company keeps. No, not THOSE kind of secrets….
Part 1 concentrated on the User Secrets functionality that .NET core provides, pretty much out of the box. Part 2 will be more complex as this deals with securing your data out there, in the real world; For this we will use the Azure Key vault to store our secrets. Unlike the User Secrets functionality Azure key vaults of course stores all of its data encrypted. It goes without saying as this will now be business critical data this is EXACTLY what you will be wanting to do. Moreover, the less people that know these secrets the better; Realistically speaking there is near to zero reasons for even a developer to know this information. The only people who should know are your security teams. Obviously as this is all public facing there will be quite a lot more to take into account. In essence though the process is relatively simple:-
- Create and Install X509 Certificates to any machines that need to access this data.
- Create an Azure Key Vault utilising the exported {insert} for securitisation
- Add your named secrets (same names) to your key vault.
- Register your application with Azure (It doesn’t need to be hosted on Azure)
- Associate the Application with the Vault
- Add Configuration to application allow AzureVault Configuration connectivity.
Creating Certificates is not really my bag, that kind of thing is best left to people who really understand it, which I don’t. Suffice to say i was able to create a Self Signed Certificate using this Plural Sight application. In my instance the certificate I created was exactly like this.

I then created a pfx file as shown above, these are files that contain the entire certificate chain as well as the Private Key. These files should thus be secured heavily when you are storing them on your infrastructure.
I then installed this certificate file onto the machine that the application is to be run from, locally, by searching for the ‘Manage Computer Certificates’ application. Once the application has been loaded You can navigate to the Personal certificates and just Import

You will then be taken through a wizard process which will ask you which certificate to use (the one we generated) and where to store it (Personal store on the local machine). Once you have run through this wizard the certificate should be installed into your certificate store.
We then need to generate a certificate for export to our Azure Server. This certificate as it is public facing should NOT contain your private key. Thus we click on our new certificate in the Key Store and select the ‘Export’ option. We then indicate that we don’t want to Export the Private key

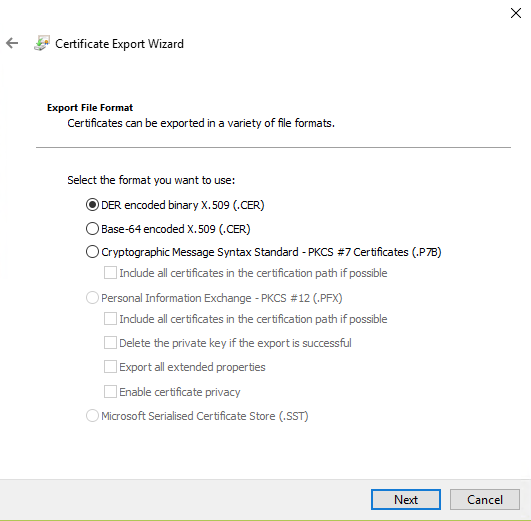
In addition we also select the DER encoded x509 binary as our output type.

And we are then prompted to save this file to our local system. Once we have this file we can then start to look at getting the Azure side of things set up. Lets start by registering our application
We select the Azure Active Directory option

Once we load this screen we will load the App Registrations Blade as shown below. This is where you store Applications registered underneath your organisation. They dont HAVE to be hosted on Azure to appear here.

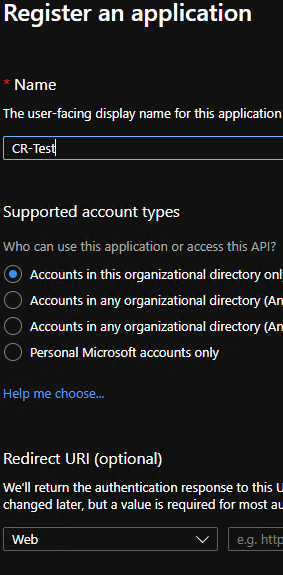
We then Elect to create a New Registration and configure it thus. The name can of course be whatever you want

Once we have created our Application we can then register our certificate with the application. We select the ‘Certificates & Secrets’ blade and then elect to upload the PEM certificate we created earlier, that is…. the certificate with only a public key.

As you can see upon uploading the certificate a thumbprint is generated for that certificate. This can be used to uniquely identify a certificate but without divulging sensitive data. We need to keep a note of this thumbprint as we will be using it a little later on.

Thats the configuration for our application done, If we go back to the App Registrations blade you should now see the Application that we have set up. In addition you should see a Application (Client) ID. You will need to make a note of this for your configuration settings later

Now that the application is all set up we just now need to set up our sensitive data. For this we need to create our KeyVault which is an Azure service of its own. There is not much to configure in the first instance. We start by creating a Key Vault of a certain name.

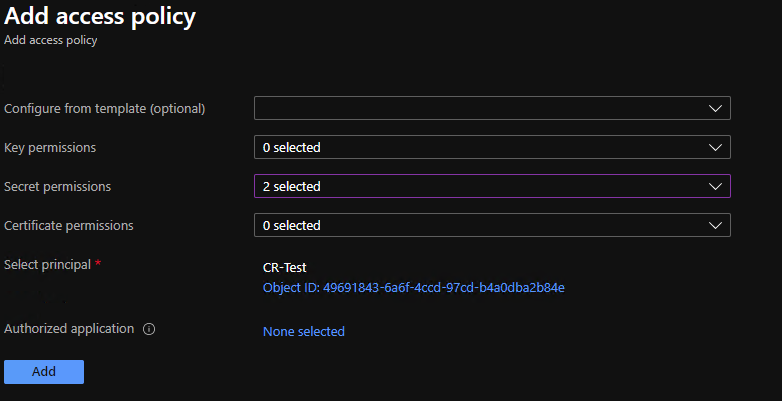
The key vault that I created is called kvCRTest. This is another setting that you will need to remember for later use. We then need to control the access policies for this key and the application that we registered above.The application should merely be allowed to enumerate over the secrets list and retrieve the details of a secret. To set this up we select the ‘Access Policies’ blade

We then configure the secret permissions to allow ‘Get’ and ‘List’. as shown below

We then need to assign this access policy to the app registration that we created a little earlier. As you can see I have selected my CR-TEST application.

We can now start to create the actual secrets. We thus select our key vault once again and then select the ‘Secrets’ blade as shown below.

As you most likely remember the json settings that our application consumed from the User Secrets area had our database connectivity stored under the setting name ‘ConnectionString:TrustedUser’. The ‘:’ character is however not a valid character within the Azure Key vault stores. We thus have to instead use the — character which in this instance is semantically the same thing. We then also enter our secret, in this instance that would be our trusted connection and then we press Save.

Our secret is now set up and ready to consume

Ok, So we’re nearly there I promise you. We now just need to set up our web application so that it can obtain this secret data from Azure, rather than using the User Secrets area. Actually… thats not quite correct, what it will actually do is to overwrite the data originally obtained from the User Secrets area. The entire .NET configuration system functions in this manner, taking the last loaded data as having more precedence than the previously loaded data. First off, lets set up our application json file with a few values that we will need, namely the 3 values we obtained from above.

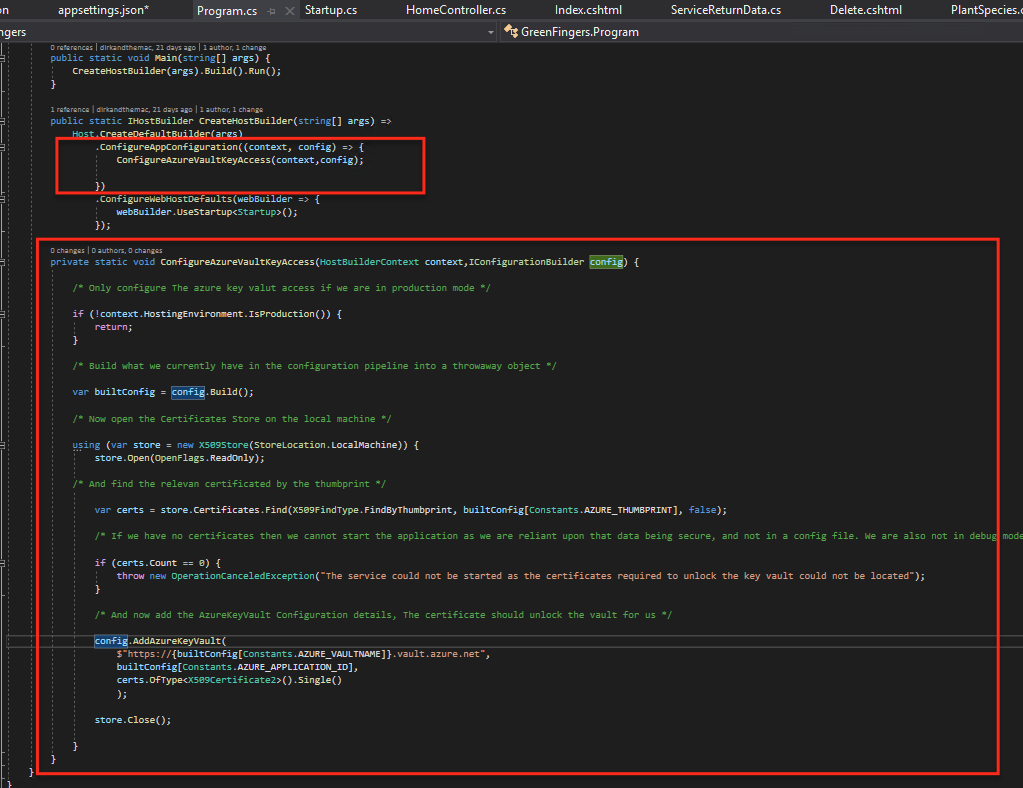
Despite the fact that all of this data is publicly accessible it is of no use to anyone unless they have the original certificate installed on their box as the certificate will be used to validate that access may be granted to that particular secret. We then need to make this relatively simple change to the web application Program.cs file. This change ensures that the web host will add Azure Secrets to its configuration pipeline. In this instance we are only interested in doing this if we are in Production, not debug mode.

We firstly obtain the state of the configuration as it currently stands. We then open the local certificate store and obtain the certificate matching the thumbprint we stored up on Azure. This will be the same on our local machine as the thumbprint is portable. Once we have the locally installed certificate we can then configure the Azure Key Vault. In order to access the method AddAzureKeyVault you will need to add a reference in your main web application to the following library via PackageManager.
Microsoft.Extensions.Configuration.KeyVaultYou should then configure access to the configuration by supplying the certificate you obtained earlier, the application ID that you obtained and in addition the url to your Key Vault. The URL is always accessed in the following form:-
https://{VaultName}.vault.azure.netYour application is now ready and upon running in Production Mode you should see that the value you obtained when calling your Configuration[“ConnectionStrings:TrustedUser”] is thte value stored in Azure, not that stored in your user secrets area.

Fly my pretties….. Fly.


2 comments
Comments are closed.